Let's customize the Splash Screen of a MAUI app

I am a passionate mobile app and software developer with a focus on C# .NET, Xamarin.Forms and .NET MAUI.
Intro
A custom company or app logo that shows up while an app is starting is a nice eye catcher and helps with strengthening the recognition of a brand. In this blog post I want to show you how you can easily modify the splash screen which comes already prepared with new MAUI app projects with your own logo and background.
Considerations
In the past, apps would show complex graphics or fancy animations on the splash screen. With the advent of newer mobile operating system versions, especially since Android 12.0, mobile app developers have less options for the customization of the splash screen of an app, at least for simple scenarios.
For the purpose of a unified look and feel, the splash screen should be simple and feature only a custom logo and a simple background. Modern apps have relatively low start up latencies, so that the splash screen will not be visible for a long time anyway. Therefore, I will only focus on adding a custom logo and background color, advanced scenarios including animations and splash screen activities won't be covered.
However, as an extra goody, I will show you how to change the theme of the splash screen based on the system theme on Android.
Note: Starting with Android 12.0, the splash screen icon will be displayed inside a circular frame and everything outside that frame will be hidden by a mask. For more on this, please refer to the official documentation.
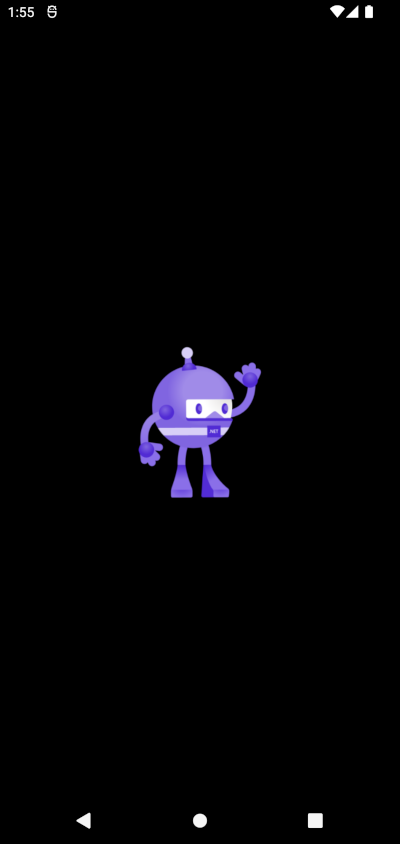
The default splash screen
This is what the default splash screen of the MAUI app template project looks like:

The logo and background color are defined in the .csproj file of your MAUI app project. You can edit the file by right-clicking on the project and selecting "Edit Project File". Then scroll down to the <PropertyGroup> that contains the following:
<!-- Splash Screen -->
<MauiSplashScreen Include="Resources\Splash\splash.svg" Color="#512BD4" BaseSize="128,128" />
Add your own logo
In order to add your own logo, the only thing you need to do is replace the splash.svg with your own logo. As an example, we will just use the dotnet-bot.svg which comes with the template, but we give it a different name, e.g. mysplashscreen.svg:
<!-- Splash Screen -->
 <MauiSplashScreen Include="Resources\Splash\mysplashscreen.svg" Color="#512BD4" BaseSize="128,128" />
Important: The logo should be square and with a transparent background for best results.
Note: At the time of writing, there is an issue with the one of the build actions of MAUI, which requires giving the splash screen image a completely new name each time it is changed. This will be fixed in a future release.
Change the background color
Now, we just need to change the background color of the splash screen to make it look great:
<!-- Splash Screen -->
 <MauiSplashScreen Include="Resources\Splash\mysplash.svg" Color="#000000" BaseSize="128,128" />
Result
Pretty cool, we now have a custom splash screen that works on Android and iOS:
iOS

Android
Change appearance based on Android system theme
On Android, there is a little trick on how to go even a step further and change the background color (and status bar theme) for the splash screen depending on the selected system theme. For this, we can take advantage of the night mode feature to show the black background only for dark mode and a white background for white mode, which is a neat little extra.
Light Mode
In your MAUI project, navigate to the Platforms/Android/Resources/ folder and, if not present yet, add a values subfolder. In this folder, create two files (or edit the existing ones):
- colors.xml
- styles.xml
Attention: The styles.xml actually probably already exists and is simply hidden from the project. If so, right-click on the values folder and select Add -> Existing Item and then select the styles.xml file in that location.
Then, in your colors.xml define some colors, e.g.:
<?xml version="1.0" encoding="utf-8"?>
<resources>
  <color name="colorPrimary">#c2c2c2</color>
  <color name="colorPrimaryDark">#ffffff</color>
  <color name="colorAccent">#3c3c3c</color>
</resources>
Next, create your own Theme in the styles.xml, inherit from Maui.SplashTheme and set your color for the android:windowSplashScreenBackground item:
<?xml version="1.0" encoding="utf-8" ?>
<resources>
  <style name="MyTheme" parent="Maui.SplashTheme">
    <item name="android:windowSplashScreenBackground">@color/colorPrimaryDark</item>
    <item name="android:windowLightStatusBar">true</item>
  </style>
</resources>
This will set up your splash screen color when the user is using the Light theme of Android.
Dark Mode
For Dark theme, you need to do essentially the same as for the Light theme, with a small difference.
In your MAUI project, add the following subfolder: Platforms/Android/Resources/values-night (note the -night suffix). In this folder, again create the two files:
- colors.xml
- styles.xml
In your colors.xml define some colors, e.g.:
<?xml version="1.0" encoding="utf-8"?>
<resources>
  <color name="colorPrimary">#c2c2c2</color>
  <color name="colorPrimaryDark">#000000</color>
  <color name="colorAccent">#c2c2c2</color>
</resources>
Again, create your own Theme in the styles.xml, inherit from Maui.SplashTheme and set your color for the android:windowSplashScreenBackground item:
<?xml version="1.0" encoding="utf-8" ?>
<resources>
  <style name="MyTheme" parent="Maui.SplashTheme">
    <item name="android:windowSplashScreenBackground">@color/colorPrimaryDark</item>
    <item name="android:windowLightStatusBar">false</item>
  </style>
</resources>
This will set up your splash screen color when the user is using the Dark theme of Android.
When you're done, your folder structure should look something like this:

Final Step
Finally, we still need to apply our custom theme to our MainActivity like this:
[Activity(Theme = "@style/MyTheme", MainLauncher = true, ConfigurationChanges = ConfigChanges.ScreenSize | ConfigChanges.Orientation | ConfigChanges.UiMode | ConfigChanges.ScreenLayout | ConfigChanges.SmallestScreenSize | ConfigChanges.Density)]
public class MainActivity : MauiAppCompatActivity { }
Android: Light Mode

Note: The background color of the image can only be set once in the <MauiSplashScreen> build action and therefore is not adaptive, unfortunately. Notice the round image mask on Android as described in the beginning, as well.
Android: Dark Mode
Conclusions
Setting up a simple splash screen is very easy with .NET MAUI, because the <MauiSplashScreen> build action pretty much does all the work for you as it automatically generates everything for you. Unlike Xamarin.Forms, there is no need to create your own storyboard for iOS, for example, anymore.
If you enjoyed this blog post, you may want to follow me on LinkedIn, subscribe to this blog and star the GitHub repository for this post.